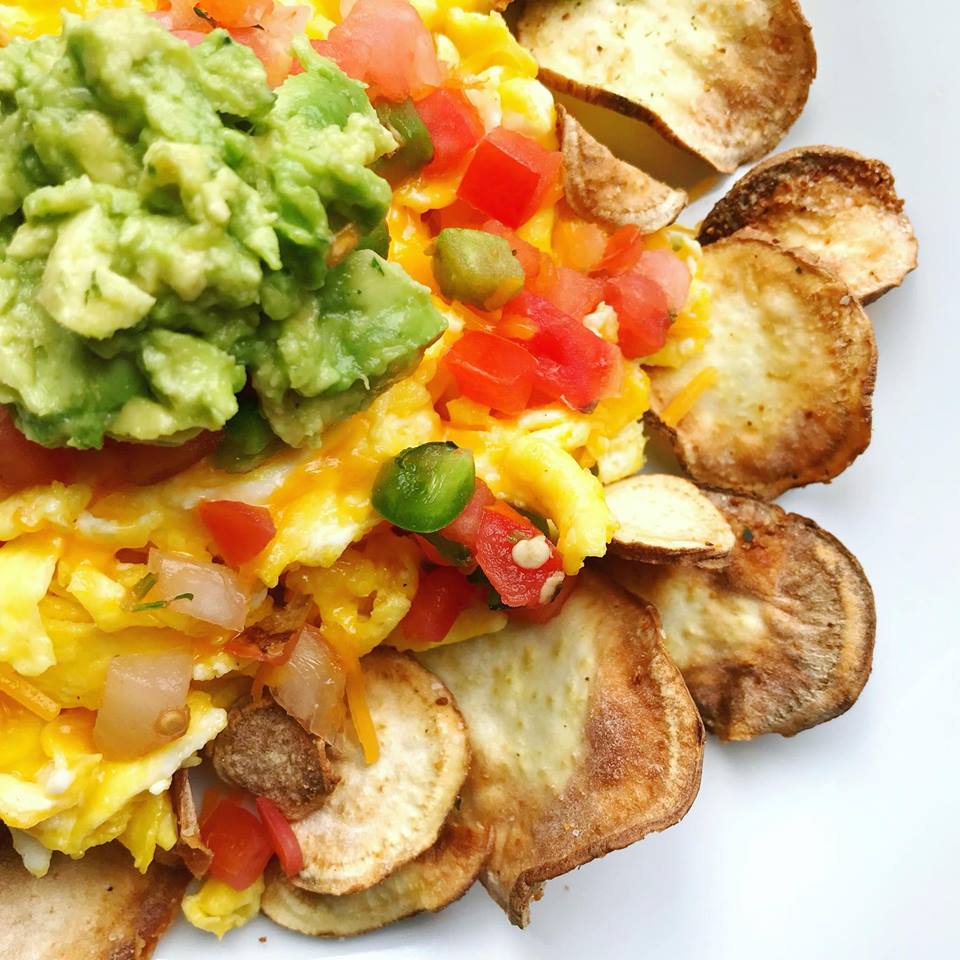
Ready to lose weight for the last time?
Let's do this
Recipes

Air Fryer Chicken Strips

GARLIC PARMESSAN (5).png

I am obsessed with Chicken Strips and I won’t even lie, a huge guilty pleasure of mine is frozen chicken nuggets. No shame here. I am allergic to gluten and I like to eat healthy, so those two combined make it tough to enjoy chicken strips. A while back, I came up with a Parmesan Ranch Chicken Strip recipe that I loved and was a huge hit in our house. I decided it was time to make over the recipe, but this time, use my air fryer! Was it possible to make a crispy chicken strip without frying them in oil? I was on a mission to find out!

These were a huge hit in our house and when my Dad tried them, he actually thought I had cooked frozen pre-made chicken strips in my air fryer and had no clue they were homemade. These hit the spot and feel like a cheat!

INGREDIENTS

  • 2 chicken breasts, cut into strips

  • 1/4 cup flour of choice (I used gf all purpose flour)

  • 2 eggs

  • 1 tbsp ranch seasoning + 1 tsp

  • 1/2 cup of gluten free Italian breadcrumbs

  • Salt and pepper

  • Cooking Spray

D IRECTIONS

  1. In a small bowl, combine flour and 1 teaspoon of ranch seasoning, then set aside.

  2. In another small bowl, scramble two eggs and then slowly stir in 1 tablespoon of ranch seasoning, then set aside.

  3. In another small bowl, add breadcrumbs and set aside.

  4. Take chicken strips and cover each one in the flour mixture, then into the egg mixture and then cover in the breadcrumbs. Be sure to shake of excess at each step. Season with salt and pepper.

  5. Lightly spray with cooking spray (this step can be skipped if you don’t want to use cooking spray).

  6. Place chicken in your air fryer and cook at 300 degrees for 10 minutes, flipping halfway through.

  7. Turn your air fryer up to 400 degrees for another 5-7 minutes. Flipping halfway.

  8. TIP: My biggest recommendation is to babysit your air fryer the first time you cook these and check your chicken every few minutes. Cooking times can vary based on the size of your air fryer. If your chicken is browning too quickly and not cooked inside, turn down the temperature. If your air fryer fully cooks your chicken quicker, then crank up the temperature on your air fryer sooner to brown the outside.

If you are following the 21 Day Fix meal plan, each thin chicken breast counts as one serving. Our two chicken breasts filled up two red containers. Half of the recipe counts as 1 red and 1/2 yellow. 

Recipes

Air Fryer Butternut Squash Fries

GARLIC PARMESSAN (6).png

I am absolutely obsessed with french fries and have always wanted to find a way to make a crispy fry out of a vegetable so I would feel less guilty about eating them. Plus, anyone who follows the portion fix meal plan like me, it is always a win when you find a food you love that counts as a green! LOL! I have recently discovered a love for butternut squash and I love how easy this recipe is!

INGREDIENTS

  • 1 butternut squash, peeled and sliced into thin fries

  • Sea salt (garlic salt works too!)

  • Cooking Spray (optional)

DIRECTIONS

  1. Place your butternut squash fries in your air fryer at 300 for 20 minutes, flipping/shaking every 5-7 minutes. If you want crisper fries, lightly coat with cooking spray!

  2. Turn your air fryer up to 400 degrees for 5-8 minutes, shaking every 2 minutes.

  3. Once your fries are to your desired crispiness, remove from fryer and sprinkle with sea salt and enjoy!

TIP: Air fryers can vary based on brands and sizes. The first time you cook these, keep a close eye on them and shake often. If your fries appear to be fully cooked before the 20 minutes, crank up the temperature sooner to start crisping them up. If you want them crispier, cook them longer at 400 degrees. Play around with your air fryer to determine the best cooking time! My cooking times are based on my Black and Decker air fryer.

I love these fries and prefer them on the crispy side! I like to dip these in fat free plain greek yogurt mixed with a little ranch seasoning! So yummy!

If you are following Portion Fix: 1 cup of fries is counted as 1 green.

Health and Fitness

Where it all began 5 years ago…

5 years ago today, I went to a conference at work where I had an ‘ah-ha’ moment that started this whole thing.

One decision to start led to losing 75 pounds, learning to love myself, gaining confidence, finding my purpose and the courage to pursue my dreams and start my own business.

ALL OF THIS from one simple decision to just start. 

The next day, after the conference, I decided to start blogging again. I used to blog way back in college about running, but I stopped when I hurt my shin and life spiraled after that. I blogged the early days of my journey and I then moved to this lovely site instead. I wanted to republish a few of my blogs in the early days of my journey. Maybe you are on the starting line of your journey, looking at all of these women on social media, feeling like they just don’t get it.

Girl, I get it. I was there too once. And one simple decision to start could change your life, just as it did mine.

Here is the blog I wrote, September 28th, 2012, the day after I attended the work conference:

______________________________________________________________________________

This is weird for me. This blog used to mean so much to me and now I have not blogged in over a year. I have stopped running, I am not happy with myself and honestly I feel like I don’t even know who I am anymore.  As I read through old posts on here, I remember how much joy running brought me. Why did I let a stupid injury stop me?

Lots of things in my life have changed over the last year. I got into a bad relationship, forgot who I was completely. I gave up my entire life for someone who I wasn’t all too interested in.  I liked the idea of him, but didn’t really like him. Eventually, I realized that he wasn’t what I wanted and I broke things off. Ever since then, I feel like I have been in this weird process of trying to find myself.  Who the heck am I? What do I want? What are my goals?

I have been doing a lot of soul searching, lots of reading, trying to pinpoint what I need to do to get back on track.  Yesterday, I went to a luncheon for work.  It was an all women’s luncheon and to be honest, I was completely dreading it. I have lots of work to do and I really didn’t want to drive 30 minutes to eat lunch and be lectured.  Anyways, I went and oh my, it was EXACTLY what I needed.  Funny how that happens.  The speaker talked about how to find harmony in life. How to be at peace with yourself.  She made us write a list of our accomplishments, ten of them. Ten accomplishments?  I sat there, my mind was blank.  While everyone else scribbled things down quickly, I sat there frozen.  An accomplishment? I have nothing. So my accomplishments were:

1. Bought a new car
2. Ended a bad relationship
3. Got a new job
4. Adopted a new puppy

…and that is as far as I got. Four things? That is all I have done in 2012? We are 10 months into the year and I have four lousy accomplishments?! All of my coworkers had long lists of accomplishments that included getting married, having children, running marathons, getting promoted, being happy. I won’t lie, I felt pretty lousy.  The speaker then had us write down our Disappointments.  Oh phew, something easy.  So while everyone at the table sat there looking puzzled, I scribbled down a very long list.  Pretty sad.  Well, my list included not saving as much money as I wanted, losing friends, being single, not making as much money as I wanted to, not losing weight, not working out, not being happy…and oh boy, I could go on forever. 

She then asked us to compare our accomplishments and disappointments. And just as everyone in the room noticed, all of our accomplishments and disappointments were within our OWN control.  Those accomplishments were things I did, things I put my mind to and succeeded. The disappointments were things I did not work hard enough at, things I had a bad attitude about.  If I want to gain more friends, lose weight, workout more, make more money…I can do all of that. The only thing in my way is myself. 

Why? Why do I do this to myself? Why do I allow my fears get in the way of accomplishing the things I want to do with myself. Why do I downplay my accomplishments and focus on my disappointments? 

I started to read “Your Best Year Yet” today, one that was recommended by the speaker.  10 steps towards having the best year of your life.  Easy enough, right? Step one…make a list of your accomplishments. AGAIN?! Ok, so I sat down and took an inventory of the last year. I made a good attempt to give myself credit where credit was deserved.

My new list of accomplishments:

1. Bought a new car – my dream car
2. Ended a horrible relationship
3. Got a new job, which I really enjoy
4. Adopted the sweetest puppy ever
5. Learned to clean and maintain a clean apartment – constantly
6. Gave up gluten completely – solved my stomach issues
7. Remained single after tough breakup, giving myself time to focus on ME
8. Lost weight on my own from eating better
9. Learned to manage my anxiety without medication
10. Gained responsibility at work

This time, I was able to get all 10. And I feel really good about all 10. Sure, there are things I wish that I could put on that list. But, I guess that is what the list is for. See your accomplishments and all the things you wish you could put on that list go on your ‘disappointment’ list. And the goal is to make those disappointments become accomplishments. 

Next step is making a new disappointment list. I will make time to take a deep inventory of what I want.  More to come 🙂

Jess
 

Main Dish

P.F. Chang Copycat Lettuce Wraps

Anyone else LOVE P.F. Chang’s lettuce wraps?! They are a favorite for me! I have seen so many copycat recipes out there and decided it was time to create my own. These were a hit for me this week for lunch and love that they are meal plan approved as well!

INGREDIENTS

  • 1 pound of ground chicken

  • 1 tablespoon of sesame oil

  • 1 yellow onion, chopped

  • 2 tablespoons of garlic, minced

  • 1 tablespoon of soy sauce (I used gluten free soy sauce)

  • 1 tablespoon of fresh ginger, grated

  • 1 tablespoon of rice wine vinegar

  • 1/4 cup of hoisin sauce (I used gluten free)

  • 1 tablespoon of sriracha (more or less depending on your liking)

  • 1 can of water chestnuts, drained and chopped

  • 1/2 cup of green onions, chopped

  • Bib lettuce

  • Optional: chopped peanuts and fried rice noodles

DIRECTIONS

  1. In a large skillet over medium high heat, add sesame oil and ground chicken. Break apart chicken with a spatula and cook until thoroughly cooked. Set aside.

  2. In a medium skillet over medium high heat, add chopped onion. Cook until onion is translucent. Add water chestnuts, garlic, soy sauce, hoisin sauce, ginger, rice wine vinegar and sriracha. Stir together and cook for 2-3 more minutes.

  3. Add onion mixture to the chicken and return the skillet to medium high heat. Cook for 1-2 minutes and you mix everything together. Fold in green onions.

  4. To serve, fill the bib lettuce leaves with the chicken mixture and top with ground peanuts and fried rice noodles (recipe below)

For the Fried Rice Noodles, you will need 1 package of thin dried rice noodles (found in the Asian food section) and 1/2 cup of oil for frying, such as canola, sunflower, etc. Separate out the rice noodles by pulling them apart and cut the noodles in 4-5 inch strands. In a medium size skillet, add oil over medium high heat. The key to these noodles is making sure the oil is hot enough. Once it is hot enough, you should be able to drop in a strand and have it instantly bloom within seconds. Drop in your noodles in small batches and quickly remove them once they puff up!

If you are following portion fix, one serving is equal to:

  • 2 bib lettuce leaves

  • 1 cup of chicken mixture

  • 2 tablespoons of ground peanuts

  • 1/4 cup of fried rice noodles

This counts as: 1.5 green, 1 red, 1/2 yellow, 1 orange, 1 tsp. 

These are AMAZING as left overs and this chicken mixture could easily go over a bed of lettuce if you want something a little easier to eat if you pack your lunch for work!

Hope you enjoy!


Recipes

Garlic Parmesan Potatoes

Anyone else love ALL THINGS potato? I do! Ever since I have begun Shift Shop, I have gone grain free. Now that I have completed the program, I have decided that I feel SO good, I really want to continue with being grain free. Limiting grains means I need to get a little creative in the kitchen with my other carb options – like POTATOES! I made these last night and they were a huge hit! They are meal plan approved for anyone following portion fix!

This recipe serves TWO, feel free to double if you are serving more!

INGREDIENTS

  • 1 cup chopped baby potatoes (I used a variety pack of baby organic potatoes that I got from Costco!)

  • 2 tsp of grassfed butter (I love Kerrygold!)

  • 1/2 tsp of garlic salt

  • 1 tsp of minced carlic

  • 1 tbsp of chopped fresh chives and 1 tsp for garnish

  • 2 tsp of dry grated parmesan cheese

DIRECTIONS

  1. Preheat oven to 400 degrees.

  2. Place chopped potatoes on a baking sheet and bake for 25-30 minutes, flipping halfway through.

  3. Take potatoes out of the oven and place in a frying pan on medium high heat with butter. Cook for 5-10 minutes, stirring every 2 minutes or so. Allow the potatoes to get golden brown.

  4. Add garlic and one tablespoon of chives. Cook for another 1-2 minutes.

  5. Remove potatoes from heat and sprinkle with one teaspoon of chives and parmesan cheese.

  6. Enjoy!

If you are following the portion fix, one serving is 1/2 cup. Each 1/2 cup of potatoes counts as 1 yellow and 1 teaspoon.

Dressings

Creamy Chipotle Dressing

21078713_2080418978650143_9000380771553298730_n.jpg

I am obsessed with tacos. I could probably eat them every single day. I have been searching for a dressing for my taco salads, outside of the usual salsa or guacamole. This chipotle dressing was an instant hit and gives the salad such great flavor.

INGREDIENTS

  • 1 cup of greek yogurt

  • 2/3 cup of cilantro

  • 1 tbsp of lime juice

  • 1 tsp of garlic powder

  • 1 tsp of onion powder

  • 1/2 tsp of paprika

  • 1/4 tsp of sea salt

  • 1-1.5 Chipotle Chili peppers in adobo sauce

  • 1 tsp of adobo sauce from Chipotle Chili peppers

DIRECTIONS

  1. Place all ingredients in a blender and blend until smooth!

If you are following the portion fix meal plan, please count as a red container. I use 2 tablespoons on my salad and count as 1/4 red.

For the taco salad, here are some ideas:

  • 2 cups of romaine lettuce

  • 2/3 cup of ground turkey with taco seasoning

  • 1/4 cup of black beans and/or corn

  • 1/4 cup of guacamole (I use avocado with garlic salt)

  • 2 tablespoons of creamy chipotle dressing

  • 1 cup of miscellaneous veggies like onions, tomatoes or peppers

The salad above would be counted as 3 greens, 1 red, 1/2 yellow and 1 blue if you are following portion fix!

Recipes

Sweet Mustard Chicken Salad

After starting the official Shift Shop test group last week, I have realized that although I have thought that I was being strict with my portion fix meal plan, I have not been. I am really guilty of adding a little extra olive oil, a little grass fed butter and not counting my marinades as anything. I think it is easy to convince ourselves that a little bit here and there just doesn’t count. Well, hate to tell you, but even if we don’t count these things, our bodies still do. Last week, I was on a hunt to make a delicious salad that had a ton of flavor, but used a marinade with only free items on my meal plan. Mustard is free and I love a good honey mustard salad, so I decided to get a little creative and this is what I came up with! Hope you enjoy!

Serves ONE.

INGREDIENTS

honey-poppyseed-organic_grande.png

  • 4 ounces of chicken, diced

  • 1 tablespoon dijon mustard

  • 1 teaspoon vinegar

  • 1/4 teaspoon garlic powder

  • 1/4 teaspoon onion powder

  • 1/8 teaspoon paprika

  • 1/8 teaspoon sea salt

  • 1/8 teaspoon stevia (I wanted to make it a bit sweeter to cut the mustard and vinegar)

  • 1/8 teaspoon chili powder (optional)

  • 1.5 cups romaine, chopped

  • 1/4 cup roma tomatoes, chopped

  • 1/4 cup carrot shreds

  • 1/8 avocado

  • 2 tablespoons Tessemae Honey Poppyseed Dressing (or any other oil based dressing)

DIRECTIONS

  1. Combine diced raw chicken, dijon mustard, vinegar, garlic powder, onion powder, paprika, sea salt, stevia and chili powder in a ziplock bag. Mix around and refrigerate at least 30 minutes.

  2. In a pan over medium high heat, add chicken mixture and cook for a total of 6 minutes, or until no longer pink, stirring often. Set chicken aside and allow to cool.

  3. Meanwhile, combine romaine, tomato and carrot shreds in a bowl.

  4. Top salad with the chicken, avocado and two tablespoons of dressing.

If you are following the portion fix meal plan, this salad counts as: 2 green, 1 red, 1/4 blue and 1 orange.

If you need to bulk up your salad, here are some additional ideas:

  • To add more greens, add more romaine and red onions

  • To add more reds, add two hard boiled eggs or turkey bacon

  • To add in yellows, add in black beans

  • To add more blues, increase amount of avocado or add almonds

This salad is so easy and you can prepare your chicken mixture in advance as well as dice up your chicken and veggies. If you cannot find the Tessemae dressing, feel free to use any oil based dressing to substitute.

Jess


Recipes

Spaghetti Squash Chicken Pad Thai

This recipe was adapted from The Beachbody Blog. I wanted to make it my own and add more protein to it! I was a little hesitant to try this. It isn’t a simple recipe AND I am usually not a huge fan of spaghetti squash. Pad Thai is my absolute favorite and how can I compete with it?! I was afraid this wouldn’t taste anything like the real thing, but oh my goodness, I was WRONG. Sure, these aren’t rice noodles, but it tastes nothing like spaghetti squash! SO GOOD. What an amazing way to get in your veggies!

INGREDIENTS

  • 1 spaghetti squash

  • 2 tbsp + 1 tsp rice wine vinegar

  • 2 tbsp + 1 tsp fish sauce

  • 1 tbsp honey

  • 4 tbsp water

  • 3 chicken breasts, chopped in bite size pieces

  • 1 tbsp cornstarch

  • 8 tsp. peanut oil, divided use

  • 1 onion, thinly sliced

  • 3 eggs, slightly beaten

  • 4 cloves of garlic, chopped

ADDITIONAL TOPPINGS

  • Green onions, chopped

  • Cilantro sprigs

  • Crushed red pepper

  • Lightly salted peanuts, chopped

  • Bean sprouts

DIRECTIONS

  1. Preheat oven to 350° F.

  2. Place squash on a parchment lined baking sheet. Poke squash 2 or 3 times with a fork. Bake for 60 to 80 minutes. Cool for 20 to 30 minutes. Cut squash in half lengthwise. Remove seeds. Scrape flesh into stringy noodles. Set aside.

  3. To make sauce, heat rice wine vinegar, fish sauce, honey and water in a small saucepan over medium heat. Cook, stirring constantly, for 1 to 2 minutes. Add additional water is sauce is too tart. Set aside.

  4. Coat chicken in cornstarch in a small bowl; mix well.

  5. Heat a large wok (or skillet) over high heat.

  6. Add 2 tsp. oil, swirling to cover surface of pan. Add chicken; cook, stirring constantly, for 6 to 8 minutes, or until chicken is fully cooked. Remove chicken from pan and place on a large plate. Set aside.

  7. Add 2 tsp. oil to pan; cook, over high heat, swirling to cover surface of pan. Add onions; cook, stirring constantly, for 3 to 4 minutes, or until onion are light golden brown. Remove from pan; place on plate with chicken. Set aside.

  8. Add 2 tsp. oil to pan; cook, over high heat, swirling to cover surface of pan. Add eggs; cook over medium heat. Do not stir. As eggs set, lift edges, letting uncooked portion flow underneath, creating a very thin omelet. When eggs are set, cut them with your spatula. Remove eggs from pan and place on plate with chicken and onions. Set aside.

  9. Add remaining 2 tsp. oil to pan, swirling to cover surface of pan. Add garlic; cook, over medium-high heat, for 1 minute.

  10. Add spaghetti squash, spreading squash into a single layer; cook for one minute, stir and make another single layer. Repeat this 6 to 8 times, cooking for about 8 minutes.

  11. Add sauce; mix well.

  12. Add chicken mixture; cook, stirring frequently, for 1 to 2 minutes, or until well mixed and heated through.

  13. Transfer to a large serving platter. Top with peanuts, lime wedges, cilantro, bean sprouts and crushed red pepper.

This recipe serves 6. I counted 1/6th of this recipe as 2 greens, 1 red, 1 tsp and added 1 orange of chopped peanuts and sprinkled with red chili flakes, cilantro and green onions. This tastes AMAZING as leftovers too!

Enjoy!

xoxo – Jess

Main Dish

Crockpot Thai Peanut Sauce Chicken

INGREDIENTS

  • 3 chicken breasts

  • 1 can of coconut milk

  • 1 cup chunky natural peanut butter (I used Adam’s Chunky Peanut Butter)

  • 4 cloves garlic, minced

  • 3 tbsp honey

  • 3 tbsp gluten free soy sauce

  • 2 tbsp lime juice

  • 2 tbsp rice wine vinegar

  • 2 tsp red chili flakes

  • Brown rice (I use Trader Joe’s frozen brown rice, 1/2 cup per serving)

TOPPINGS

  • Lightly salted peanuts, chopped (1 use 1 tbsp per serving)

  • Fresh Cilantro

DIRECTIONS

  1. Arrange chicken breasts on the bottom of the crockpot.

  2. Combine coconut milk, peanut butter, garlic, honey, soy sauce, lime juice, rice wine vinegar and red chili flakes in a bowl and mix well. Pour over chicken.

  3. Cover and cook on high for 3-4 hours or low for 6-8 hours.

  4. Once chicken is fully cooked, shred it and return to the crock pot with the sauce.

  5. Serve over brown rice and garnish with chopped peanuts, additional red chili flakes and cilantro.

If you are following the 21 Day Fix, 3/4 of a cup is your serving size. I put 3/4 cup of the chicken mixture over 1/2 cup of brown rice and garnish with 1 tbsp of chopped peanuts and add cilantro and red chili flakes. This counts as 1 red, 1 yellow, 1/2 orange and 3 tsp.

This is GREAT as leftovers too! 

Enjoy!

xoxo – Jess

Main Dish

Trader Joe’s Peanut Sauce Chicken & Rice Bowls

This is my GO TO lunch and although the recipe is incredibly simple, I get asked for it all the time! So why not write it up?! 🙂 This would be great with mixed veggies like snap peas, broccoli and carrots too!

Serves ONE. Multiply recipe if cooking for more than just yourself 🙂 

INGREDIENTS

  • 1 chicken breast fillet, diced

  • 2 tbsp of Trader Joe’s Spicy Peanut Sauce Vinaigrette + 1 tbsp

  • 1/2 cup of Trader Joe’s Frozen Brown rice, cooked

  • Pam Cooking spray

DIRECTIONS

  1. Marinate chicken breast in a tablespoon of the Trader Joe’s Spicy Peanut Sauce Vinaigrette. Longer the better 😉

  2. Preheat a frying pan sprayed with cooking spray on the oven over high heat.

  3. Add two tablespoons of the vinaigrette to the pan. Let it sizzle for about 30 seconds. It should start bubbling up!

  4. Add diced chicken breast and cook for 5 minutes, stirring often.

  5. The sauce should bubble up and get sticky. I try to make sure the caramelized sauce sticks to the chicken before removing from heat.

  6. Serve chicken over 1/2 cup of cooked brown rice.

21 Day Fix Container Count: 1 red, 1 yellow, 1 orange

Main Dish

Chicken, Butternut Squash & Guac Rice Bowls

I knew this idea was either going to be weird or…delicious. And I am so happy to say, this was DELICIOUS. My husband licked his bowl clean, raving about how it was the best meal ever. I am nursing my baby boy still and our pediatrician has told me to avoid dairy and some veggies like broccoli, cauliflower and cabbage to help his tummy. Those are all of my favorite veggies! So, I have been really trying to get a little creative with my meals to incorporate more veggies without munching on salads in the middle of winter. These rice bowls will be in our regular rotation now and they are SO easy…and best part? They are 21 Day Fix approved, gluten free and dairy free!

Recipe only calls for two chicken breast fillets, but wanted to give you an idea of what it should look like on the baking sheet!

Recipe only calls for two chicken breast fillets, but wanted to give you an idea of what it should look like on the baking sheet!

Serves 2.

INGREDIENTS

  • 2 thin chicken breast fillets

  • 1 red onion, sliced

  • 2 cups of butternut squash, cubed (I peel mine and then cut into small cubes)

  • 4 tsp olive oil (one for chicken, one for onions, two for butternut squash

  • 1 tsp chili powder

  • 1 tsp cumin

  • 1/2 tsp garlic powder

  • 1/2 tsp onion powder

  • 1 tsp sea salt

  • 1 cup of brown rice (I love Trader Joe’s frozen brown rice!)

  • 2 cups of fresh spinach

  • 1 avocado – or your favorite guacamole

  • 2 tsp garlic salt

DIRECTIONS

  1. Preheat the oven to 450 degrees F.

  2. In a bowl, combine chili powder, cumin, garlic powder, onion powder and sea salt. Set aside.

  3. In a small bowl, toss chicken breasts with one teaspoon of olive oil and then sprinkle on 1/3 of spice mixture, or to your liking. Line up the chicken breasts on the baking sheet. Repeat with the cubed butternut squash and onions. I used two teaspoons of olive oil on my butternut squash.

  4. Place baking sheet in the oven and cook for 11-13 minutes, or until chicken is done.

  5. Remove the chicken once it is fully cooked and return the onions and butternut squash to the oven. I cooked in 4 minutes increments and removed the onions once the bottoms were looking a little charred. I cooked the butternut squash for an additional 8 minutes, until the bottoms of the cubes were charring. If you want them a little more crisp, just leave them in the oven a little longer! Key here is NOT flipping the onions or the butternut squash!

  6. Meanwhile, you can get your guacamole and rice prepared! I use frozen Trader Joe’s brown rice, so this is when you can toss it in the microwave.

  7. For the guacamole, you can either use one you love or make it the way I do! In a small bowl, mash up one avocado and add in two teaspoons of garlic salt (or to your own liking). Then set aside.

  8. Once everything is cooked, you can start assembling your bowls! This recipe serves two. For ONE bowl, add 1 cup of spinach, 1/2 cup of brown rice, 1 cup of butternut squash, 1/2 of the onions, 1/4 cup of guacamole and one chicken breast (slice up!).

  9. Enjoy!!!

21 Day Fix Container Count for ONE Bowl: 1 red, 2.5 green, 1 yellow, 1 blue, 2 tsp (measurements are listed in step 8 of the recipe)

I hope you all enjoy this meal as much as we do! Feel free to get creative with this meal! Add some pico de gallo! Throw in some peppers! Such a great way to add more veggies to your diet!

xo – Jess

Main Dish

Parmesan Ranch Crusted Chicken

You know what I love? A good meal that tastes like I am cheating. One thing I used to indulge on all the time when I was overweight was chicken strips. I LOVED them. I haven’t had them in a long time and felt determined to make a version at home that was not only healthy and tasted good, but also 21 Day Fix approved. I made these last night for my family and the first word out of our mouth was, “WOW!”. That’s when I knew this recipe was a keeper. They have so much flavor thanks to the ranch seasoning and have just enough crunch! Hope you enjoy these just as much as my family does!

Serves TWO.

INGREDIENTS

  • 2 thin chicken breast filets, cut into strips

  • 1/4 cup parmesan cheese, grated

  • 1 tsp flour of choice (I used gf all purpose flour)

  • 2 eggs

  • 1 tbsp ranch seasoning

  • 1/2 cup of gluten free Italian breadcrumbs

  • Salt and pepper

  • 1 tbsp olive oil

DIRECTIONS

  1. In a small bowl, combine parmesan cheese and flour, then set aside.

  2. In another small bowl, scramble two eggs and then slowly stir in ranch seasoning, then set aside.

  3. In another small bowl, add breadcrumbs and set aside.

  4. Take chicken strips and cover each one in the parmesan mixture, then into the egg mixture and then cover in the breadcrumbs. Be sure to shake of excess at each step. Season with salt and pepper.

  5. Heat large frying pan over medium heat and add olive oil. Once the oil is hot, add chicken strips and cook for 3-4 minutes per side, or until chicken is cooked thoroughly and the outside is browned.

  6. Remove from heat and enjoy!

If you are following the 21 Day Fix meal plan, each thin chicken breast filet counts as one serving. Our filets made three strips each. Count as 1 red, 1/2 yellow, 1/2 blue and 1 tsp.